How Forms Work
Introduction
This page describes how you interact in general with the Joomla Form class and provides the code of a simple component which you can install to demonstrate use of this API. With the aid of the diagram below we'll walk through each stage of displaying a form through to handling the submitted data.
The section in pale yellow is the Joomla library code, specifically code relating to the Form class.
The rectangles with white backgrounds contain your extension code.
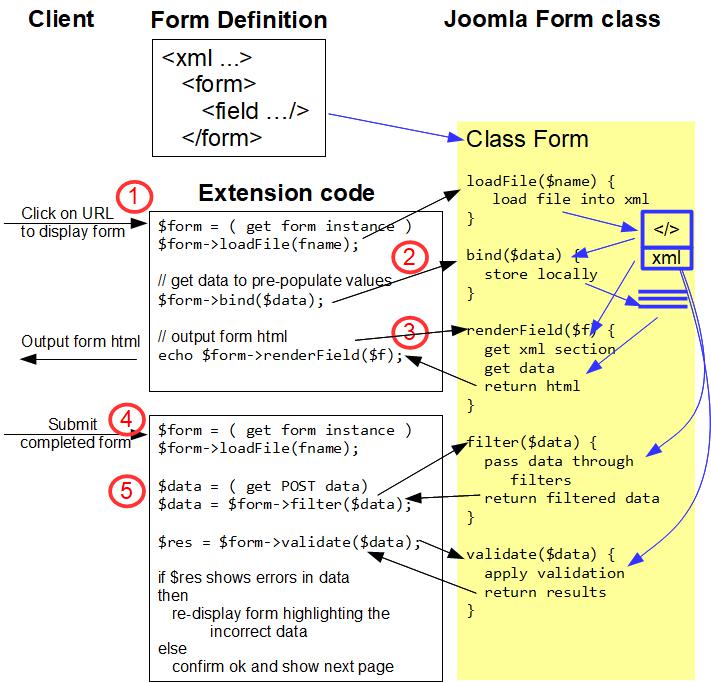
At the outset, you need to define your form in XML using Joomla Standard form field types.
See the component code below for an example.
In basic terms, each field element in your XML file maps to an HTML (mostly <input>) element in the form,
with the XML field attributes mapping to the (input) element attributes.
Common field attributes are listed in standard form field attributes.
Step 1 Loading the form
Step 1 is where the user has navigated to a webpage on which you display a form.
You first have to instantiate an instance of the Joomla Form class, and you do this by getting a FormFactory out of the Dependency Injection Container and calling createForm. You can do this with the code:
$form = Factory::getContainer()->get(FormFactoryInterface::class)->createForm("example", array("control" => "myform"));
In the above code we've created a Form instance and given it a name "example"
(you can call it whatever you like, it just needs to be unique,
so that it doesn't clash with any other Joomla forms on the same webpage)
and also passed an array with "control" => "myform".
The HTML input elements will then have name attributes set to "myform[message]", "myform[email]", etc,.
When the user submits the form then the data items will be passed in HTTP POST parameters that way,
and it's then very easy to get these into a PHP array.
Next we get the Form class to load in the XML file containing the form definition:
$form->loadFile("example_form.xml"); // pass the file path and name of the XML form definition
The Form object reads the file into memory (as a PHP SimpleXMLElement) and parses the XML to ensure it's valid. The SimpleXMLElement is represented by the blue rectangle with "xml" in the diagram.
In practice, the above 2 steps are usually combined into a single $this->loadForm call
within a Model which inherits from the \Joomla\CMS\MVC\Model\FormModel.
This latter approach is taken in the example component code below.
Step 2 Providing Pre-fill Data
You provide values for any form element you wish. For example, if this form is being used to edit a record in the database, then you would pre-populate it with existing field values from the database. You can provide values by setting up an associative array $data where for each element of the array:
- the key is the
nameof the field (in the xml file) - the value is what you want to prefill that field with
You pass the $data array as a parameter to the Form bind method, and Joomla Form then stores this data locally within the Form instance - represented by blue bars in the diagram.
Step 3 Outputting the Form in HTML
You call renderField:
echo $form->renderField($name);
where $name is the name of the field in the XML file, and you get returned the HTML which you can echo to the output. Joomla processes its XML representation of your form to obtain the section relating to the passed-in name, generates the HTML for this HTML element and includes the html value attribute based on the pre-populated data which you passed in step 2.
When outputting the form you also need to surround the input elements in a <form> element and add a submit button.
Step 4 User Submitting the Form
The user enters data into your HTML form and clicks on the submit button. The browser generates an HTTP POST request to the URL specified in the <form> element and passes to the server in an array called myform (or whatever option you chose previously) the values entered by the user; each element of the array keyed by the name attribute of the HTML input element.
Joomla routes this POST through to your component. As this is a new HTTP request the previous Form instance no longer exists, so you have to repeat Step 1 to create a Form instance and load the XML form-definition file into memory.
Step 5 Handling the HTTP POST Data
In this step you process the submitted data. This involves 4 parts:
Getting the POST data
You can use the Joomla Input functionality to get the data which the user entered. For example
$app = Factory::getApplication();
$data = $app->input->post->get('myform', array(), "array");
will read the POST myform parameters into an associative array.
Filtering the data
It is vital to sanitize any data received to avoid injection attacks by hackers. With many of the Input methods filtering is applied, but if you read them directly into an array (as above) then no filtering is applied, and you must do it explicitly using eg
$filteredData = $form->filter($data);
This applies filtering on each of the input values. The filter applied to a field is governed by the "filter=..." attribute on that field in your form XML file, or if not present then the default filter will sanitize HTML tags etc from your data values.
The possible filters which can be applied are listed in Input Filters and form filter attribute.
In addition, you can define a Custom Filter.
Validating the data
You validate the data which the user has entered by calling
$result = $form->validate($data);
Joomla compares the user-entered data with the validation you defined in your form XML file, and generates errors for fields which fail the validation. How to specify the field validation is described in Server-side Validation.
Providing user feedback
If there are validation errors then you should display those errors to the user, and redisplay the form, pre-populating the fields with the (filtered) data which the user entered previously.
If there are no errors then you can confirm this to the user, and show the next web page.
Example Component Code
To demonstrate the basic use of Joomla forms, you can download and install the Example Form Component.
This component also provides a basis for further experimentation with Joomla forms and fields.